Motorcycle Permanent Magnet Alternator
This rig will produce up to 32 amps at 30 volts of AC power. You can change the 30 Volts AC to 12 Volts DC with the addition of a "Full Wave Bridge" available at Radio Shack for less than $ 3.00. This should produce about 380 Watts DC.
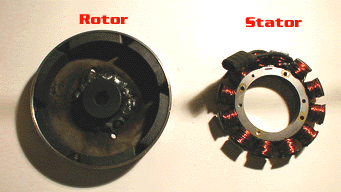
Here are the two separate parts that make up the alternator: the "Rotor" and "Stator". Be sure to order both parts! Caution: the magnets in the rotor are STRONG! Watch out when you insert the stator into the rotor, it pulls hard enough to badly pinch fingers!
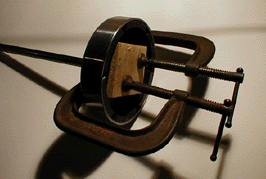
The alternator comes with a 1" diameter "spline" hole in the center. You will have to use a sprocket to adapt the rotor to your 5/8" shaft. Center the sprocket on the inside of the rotor, and clamp down using the "C' clamps and thin wood piece, as shown. Spin the rotor on the shaft to make certain it is ABSOLUTELY straight, with NO wobble! Remove the shaft from the sprocket hub. Lightly tack the sprocket to the rotor with a welder. Remove the clamps, re-insert the shaft and rotate the rotor again to ensure straightness.
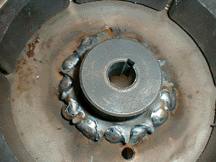
Weld the sprocket securely onto the inside of the rotor. Use aluminum foil to protect the magnets on the rotor from all welding, drilling, and grinding activities.
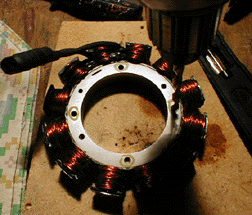
Drill out the four evenly spaced holes (circled in yellow here) in the stator to accept your 3/16" bolts. Be sure to clean up all filings before inserting into the rotor. Attach the bolt couplers with the 3/16" screws to the same side of the stator as the plug (see photo below, and photo "A" (below).

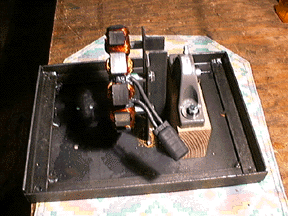
Cut two 5" pieces of angle iron. These will be your upright supports for the stator (see above photo)
Mount a bearing on the wood block using lag screws and washers. Wrap the outside edge of the stator with 3-4 turns of masking tape. This acts as a spacer. Insert the stator into the rotor (watch your fingers). Ensure that the stator is perfectly centered in the rotor. Slide the rotor/stator assembly on the shaft. Insert the key into the keyway on the sprocket hub. If the key doesn't fit, you may have to file it down with a hand file. Tighten the allen screw on the sprocket hub. Use Loc-Tite adhesive to ensure that the allen screw does not come loose. Slide the shaft on to the bearing. Add the other block and bearing.
You now have the stator and rotor centered on the unit. Rotate the rotor until the nut couplers are vertically and horizontally aligned with the baseplate (180 and 90 degree angles) . Measure the distance from (the center of) the bottom nut couplers to the base plate. Mark this distance from one end of both 5" pieces of angle iron. Measure the distance between the two top and two bottom nut couplers (it should be about 2 1/2"). Using your previous marks as a guide, mark this second measurement on the two 5" pieces of angle iron. Remove the shaft, stator and rotor from the bearings. You will need to remove the wood block to remove the rotor and shaft.
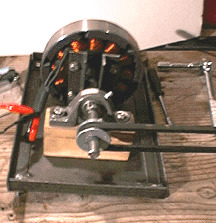
Each piece of angle iron should then be drilled on the marks made previously and bolted on the stator (as pictured above). Re-assemble the "shaft/stator/rotor/upright angle iron" assembly on the bearings.
When you are sure that the uprights are aligned correctly, weld them to the baseplate.
Remove the shaft and rotor from the bearings again. Take the masking tape off the stator. Re-assemble the entire unit.
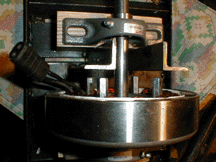
Align the shaft by loosening the screws holding down the bearings and moving the shaft until the stator is aligned perfectly inside the rotor. If the stator rubs on the bottom of the rotor, put shims between the bearings and blocks. If it rubs on the top, remove the bearings and sand the blocks. Tighten the screws when alignment is perfect.
Be sure to tighten the bearings on the shaft using the allen screws and keys. Use Loc-Tite adhesive to ensure that allen screws do not come loose.
Weld the base of the unit together, with the angle steel pieces extending just over the edge of the base plate. Align your aluminium or wood blocks to the outside edges of the base as shown in photo "A" (below). Drill four holes for each block in the base plate. Using your holes as a guide, drill tap holes through the plate into the wood blocks from the underside of the base. Screw one block into place with lag screws from the underside of the base.
When using aluminum blocks, you will have to drill and tap the blocks, substituting machine screws for lag screws.
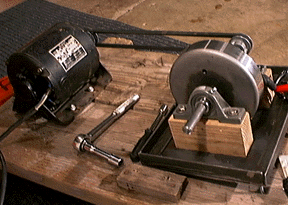
This is the unit belted to an electric motor for testing purposes. Attach the pulley to the shaft as shown in the upper right corner of the above photo. There are holes drilled in the corners of the baseplate. The baseplate is attached to the wood base with lag screws. Notice how the unit is at an angle to the wood base. This provides belt tension. To further tighten the belt, simply screw down the back two lag screws.
| Part | Part# | Supplier |
| (1) Harley Davidson
Permanent Magnet Alternator "Compu-Fire" brand |
Varies With Manufacturer | Wayne's House Of Choppers-
Kansas City, MO (816) 421 -6950 or |
| (2) Pillow Block Bearings
for 5/8" Shaft |
6X233 | Grainger |
| (1) 5/8 Keyed Shaft | 36671014 | MSC Industrial Supply |
| (1) 3/16 Key Stock | 2f788 | Grainger |
| (1) 3/16 minimum thickness
steel plate: dimensions 8"X12" |
Your local metal supply shop | |
| (1) 1/8" X 1" X 1" Angle Steel
(about 6 feet in length) |
Your local metal supply shop
or Hardware Store |
|
| (4) 3/16" diameter, (3/4 long), stainless steel bolts | Hardware Store | |
| (4) 3/16" diameter, (1" long), stainless steel bolts | Hardware Store | |
| (4) 3/16" (inside diameter), (3/4" long), Bolt Couplers (Rod Coupling Nuts) | Hardware Store | |
| (1) 2" diameter pulley (5/8" hub) | Hardware Store or Grainger | |
| Automotive V-belt that works with pulley (you choose length) | Auto Parts Store | |
| (2) Hardwood blocks (ash, hickory, white oak) or aluminum blocks that will support bearings. | Lumber Supply | |
| (8) 1/4" diameter lag screws, 1" long | Hardware Store | |
| (4) 1/4" diameter lag screws, 1/2" long
(to hold down bearings) |
Hardware Store | |
| (4) washers to fit lag screws | Hardware Store | |
| CM1501 High Current Silicon Bridge Rectifier Diode (full wave bridge) | 900-4795 | Radio Shack |
| Misc. Connectors and wires | ||
| (2) "C" Clamps | Hardware Store | |
| (1) 3" X 3" piece of 1/2 thin wood | Lumber Supply | |
| (1) 2" diameter fixed (5/8") bore roller chain sprocket | 6L796 | Grainger |
| Medium Strength (Blue) Loc-Tite Adhesive | Hardware Store |